Browsed by
Tag: nibs

Corel Photopaint .nib Blood Splatter Pack v2 Released!

Corel Photopaint .nib Blood Splatter Pack v2 Released!

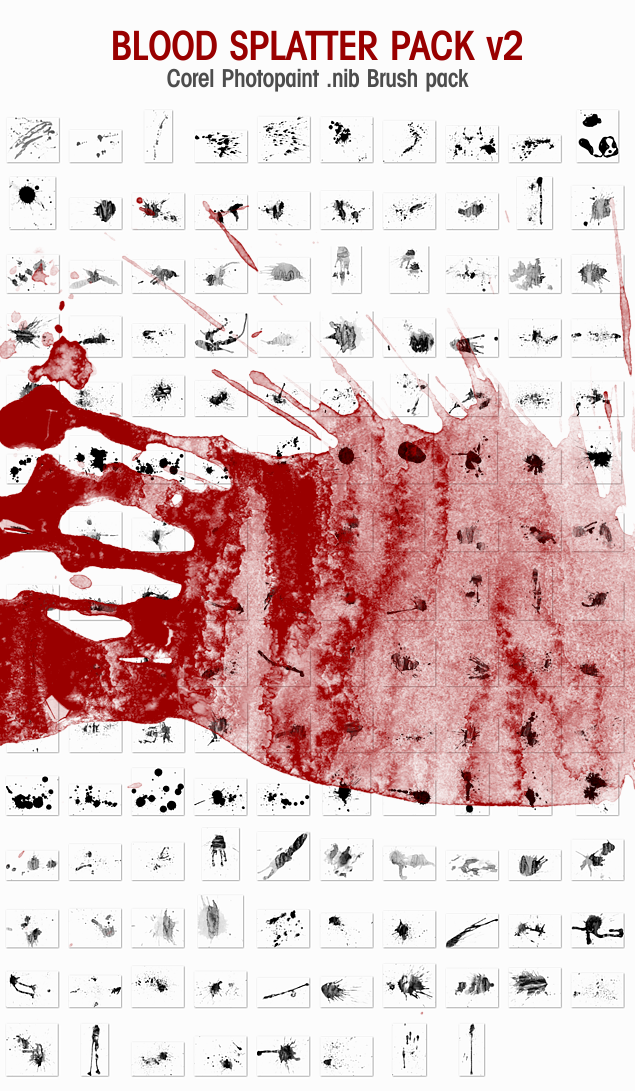
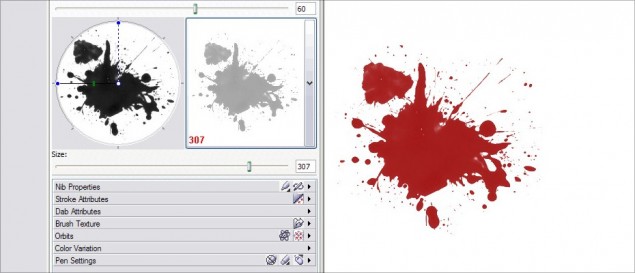
Another day, another .nib brush pack ready to go… here is the updated version of the Blood Pack with 148 blood splatter brush nibs ready to gore up your graphics in Corel Photopaint!  This is the last of the old brush packs for Corel Photopaint in the .nib brush area of the site that I needed to update, and I will now start creating all new ones for you guys as I get time.  Like Smoke Pack v2, this pack was created and tested in Corel x5.

blog_bloodpackv2

Description: Second generation .nib set of blood splatter brushes generated from several blood ABR files. This is a standalone brushpack and does not contain the default Corel nibs. Click here to download Corel Photopaint .nib Blood Splatter Pack v2. Installation instructions are here.
Download size: 17.7MB
Created: 05-09-2013

Enjoy and please comment and share below!
Dan

Corel Photopaint .nib Smoke Brush Pack v2 Released!

Corel Photopaint .nib Smoke Brush Pack v2 Released!

Hi guys!  As promised, I am slowly replacing the old generation .nib brush packs for Corel Photopaint in the .nib brush area of the site and I figured we’d start with the super-popular smoke brushes.  I will be releasing the blood splatter pack very soon, so please stay tuned.  Please note this pack was created and tested in Corel x5.

blog_smokebrushesv2

Description: Second generation .nib set of smoke brushes generated from several smoke ABR files. This is a standalone brushpack and does not contain the default Corel nibs. Click here to download Corel Photopaint .nib Smoke Brush Pack v2. Installation instructions are here.
Download size: 5.2MB
Created: 05-08-2013

Enjoy and please comment and share below!
Dan

How to Load and Install Corel Photopaint NIB Brush Packs

How to Load and Install Corel Photopaint NIB Brush Packs

A little while ago, I started offering a few brush packs for Corel Photopaint users on my blog (You can actually find those HERE) and I’ve been receiving quite a few inquiries on how exactly one goes about installing them.  Today’s little tutorial will run you through the easy process of installing the packs and explaining how they work.

WARNING: PLEASE NOTE!  Do not think of these as extra brushes you can pick… these are complete nib replacements for Photopaint, so when you use one of these packs, it will contain the default Photopaint brushes AND the extra brushes stated in the pack you download

The first thing I need to tell you is that the NIB management in Photopaint absolutely SUCKS and it’s full of bugs that have yet to be resolved.  in fact, if you Google around, you’ll find tons of posts from angry Photopaint users asking about various issues with loading, creating and deleting Nibs for pretty much any version of Corel Photopaint, including right up to X3, the latest release.  In fact, if you mess around with the Nib packs too much, you can completely corrupt the install and then you’re in for some real fun.  Here are some wonky things I noticed in the Nib management area:

  • There is a maximum number of Nibs you can add, and it’s very limited.  To make matters worse, if you hit that maximum, your Nib list starts going crazy. I don’t know what the max is… I hit it once and it killed my install and it was only after I found out there was a maximum.
  • Shouldn’t delete nibs, only add to the current ones in the pack you are using.  It’s hard to describe what happens to someone who hasn’t experiences the marvel of this absolutely infuriating bug.  Basically, let’s pretend you have 50 nibs in your pack and you delete the last two.  Let’s pretend the last 2 are some kind of circular brush.  Now, let’s say you add 2 new nibs to this pack… instead of showing the new nib in the list, it will show you the two circular nibs instead!  BUT, when you click on the nib, it will actually be your new nib shape.  Now, imagine the frustration of having a pack with 50 nibs that all have the wrong thumbnails attached.
  • You can’t start a new nib pack… you would think you can create a blank pack and start adding your own brushes, but you can’t.  I even found a blank nib pack on the net awhile ago, but when I tried adding nibs to it, I got the same issue as mentioned in the previous point.

I love Corel Photopaint, but the NIB interface is absolute crap and it’s the only huge bug I know of in Photopaint and it baffles my mind that this has not been fixed after several YEARS!  So, with that said, screwing around with Nibs SUCKS, so don’t do it unless you’re pretty good and navigating the unknown in the realm of software.  Lucky for you, I have these easy to download and install replacement packs!  You don’t have to worry about messing around with your packs, deleting and adding nibs etc… you simply download the pack and load it and you’re done.

Again, don’t think of this as extra brushes you are adding to Photopaint… it’s not.  These are complete Nib replacement packs that contain all the default Photopaint Nibs PLUS the extra Nibs stated in the pack.  So if you download the Blood Pack, each Nib pack includes the default Nibs, PLUS the Blood Nibs.  Make sense?

OK, so now let me show you how to install the packs, it’s easy.

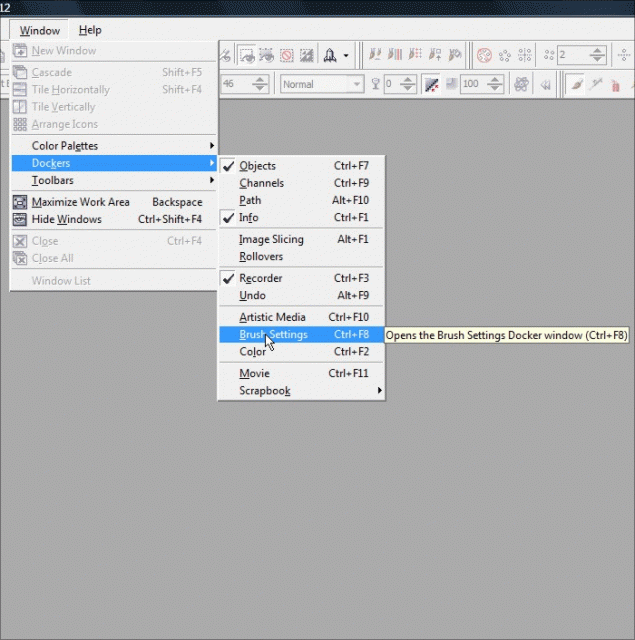
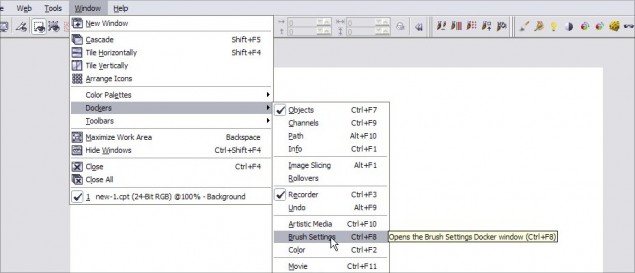
Step 1 – First thing you need to do is open Photopaint and either open up an image to edit or create a new file.  We’ll need to have something open to access the brush tools.  Once that’s open, we’ll need to open the Brush Settings Docker.  Click on Window > Dockers > Brush Settings and the Docker will open.

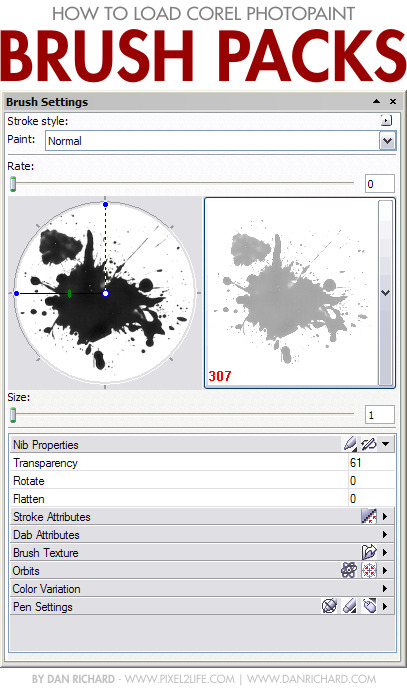
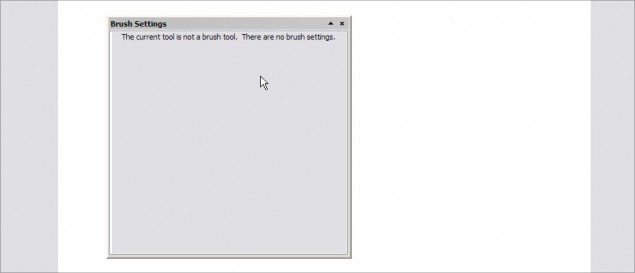
The Docker will open and probably be blank like this:

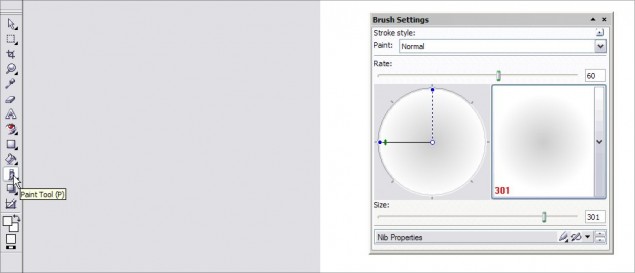
To activate the Docker so it shows the options, click on the Paint Tool icon, or just hit P:

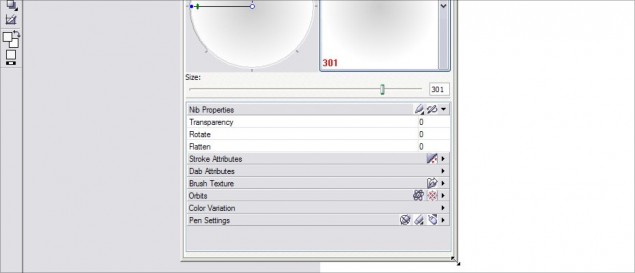
be sure to stretch the Docker open so you can see all the options:

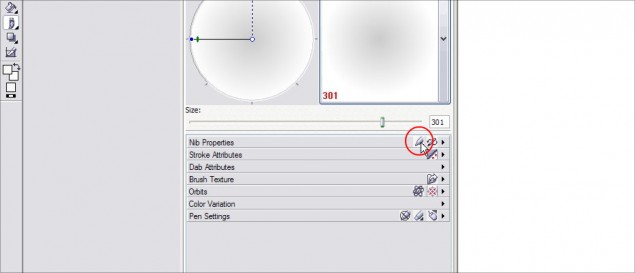
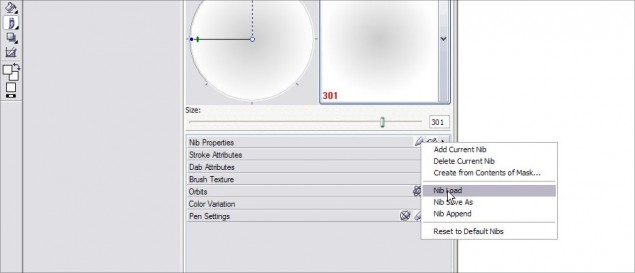
Step 2 – Time to load the Nib pack!  Click on the Nib Options button (circled in red below) and then click on Nib Load to open a file browser window:

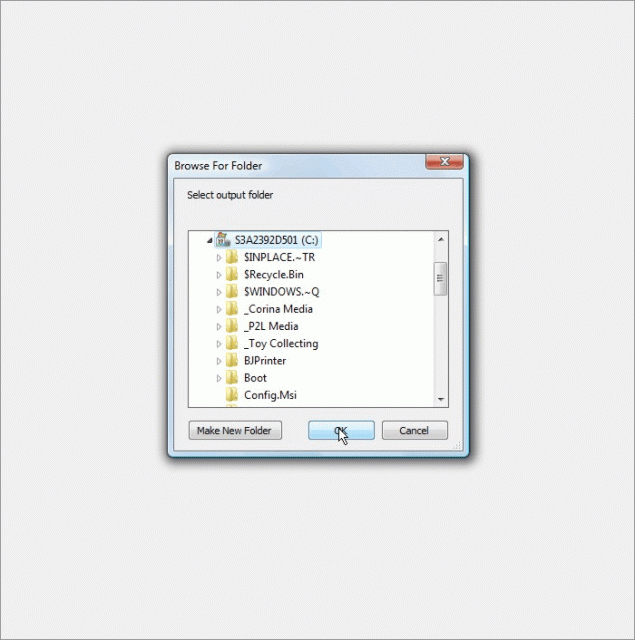
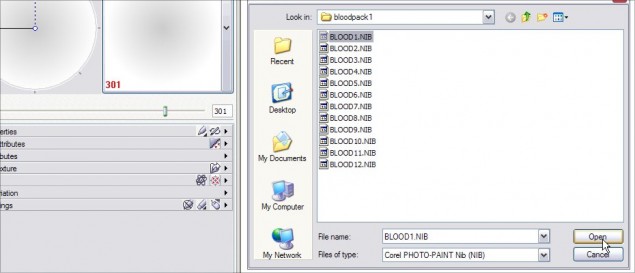
Now, just browse to the Nib pack you downloaded and extracted and click on the one you want:

All done!

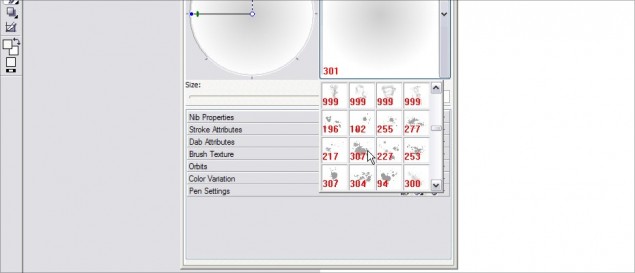
Step 3 – You can now select the nib shape and get to work!  Just use the Nib Browser to scroll through the thumbnails and you’ll see that you now have the same default Nibs, plus the custom ones towards the bottom:

Click the one you want and you’re good to go!

Pro Tip: Remember, you can use these brushes with any of the Paint tools, eraser, clone tools etc… any tool that lets you use a Nib will let you use these custom packs.

That’s it gang, easy as pie… Thanks again for reading my tutorial and please be sure to comment below or share this with your friends!

Thanks,
Dan

Importing Brushes – How to import Photoshop ABR brushes in to Corel Photopaint!

Importing Brushes – How to import Photoshop ABR brushes in to Corel Photopaint!

Introduction

Welcome to another Photopaint tutorial, and this time I think you Corel folks are going to LOVE what we’re going to do here.  I’m sure if you surf graphic sites and such, you always see people using these awesome brush packs for Photoshop, but if you use Photopaint, you’re SOL.  So you go on Google and search your heart out for ways to import these .abr brushes into Photopaint, but all you find are forum threads about people asking this very same question with either no response, or someone said “Sorry, you can’t, change to Photoshop”.  Well my friend, guess what?  NONSENSE I SAY!  Of course you can do it, so today I am going to show you how to convert and import .abr Photoshop brushes right onto Photopaint and use them as Photoshop nibs (what Photoshop folks call brushes are referred to as nibs in Photopaint).

Oh, and fun doesn’t stop there folks!  Not only will you FINALLY be able to use .abr brush packs in Photopaint, but you DON’T need Photoshop to do this and it won’t cost a cent for the third party application we’ll need to perform this wondrous task.

Have a I mentioned how excited I am bringing this to you guys?

Actually, I was a sweet tutorial a few days ago that was a photo manipulation project, and it uses this beautiful set of fairy wing brushes from DeviantArt.  I downloaded the .abr file and of course they were all but useless.  I knew there was a way to use the brushes, but I just couldn’t remember, and there was literally ZERO support online on how to figure it out.  So I altered my search and started looking for converters that could convert .abr brushes to .png files.  That’s how I found an application called ABRviewer, and it did exactly what I needed.

So here it is gang!  Read on and learn how to get those .abr brush sets working their magic in Photopaint.

Setting Up

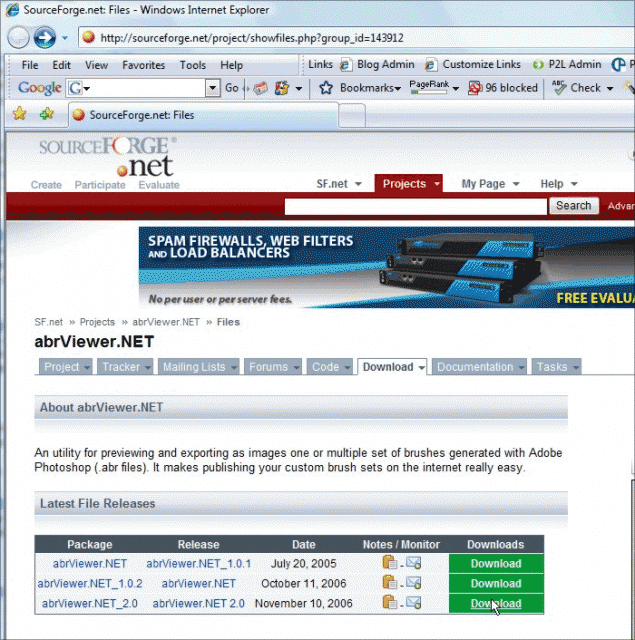
Step 1: The first step is to download the latest version of ABRviewer.  This is a completely free, open source application you can download from Source Forge.  If for some reason SF is down or they stop serving this application, I have attached the 2.0 version to the tutorial, which you can download HERE!

So go directly to http://sourceforge.net/project/showfiles.php?group_id=143912 and click on the green Download link for the version you want (I recommend you grab the latest):
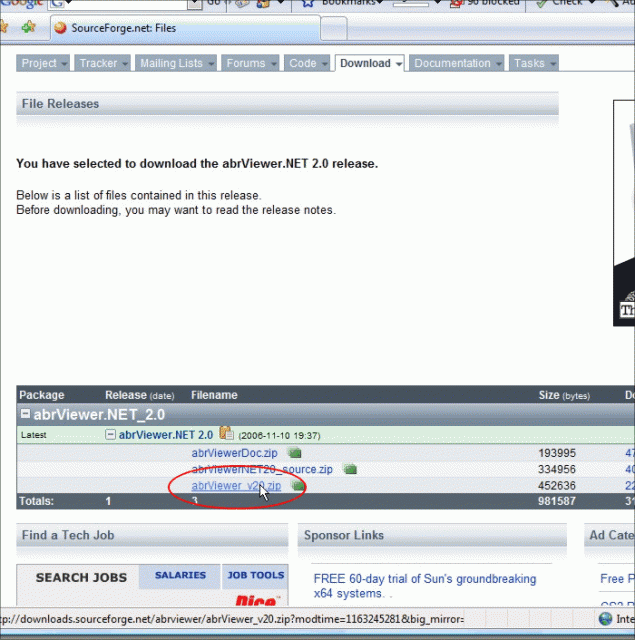
On the following screen, click on the filename you want to download (On this screen shot, the first file is the documentation and the second file is the source code.  We want the third, which is the distribution set used to install the application):
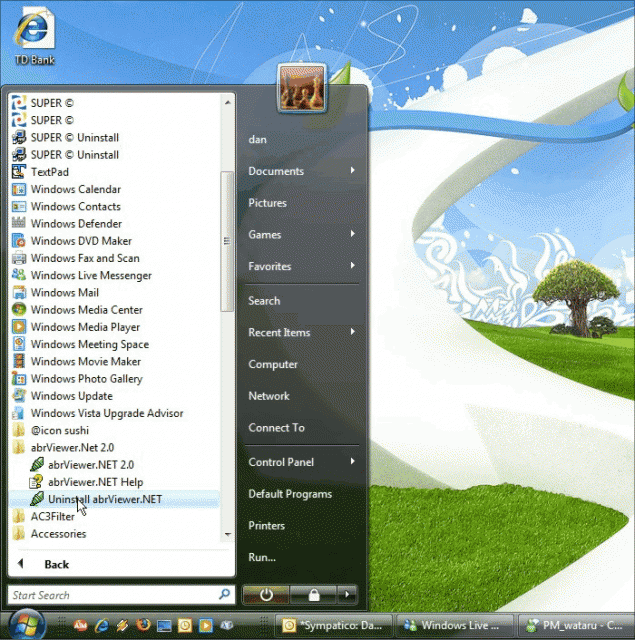
Step 2: Once the download is complete, unzip the archive to a temporary directory and run through the setup to install the application.  Once installed, you’ll find the new application under Programs > abrViewer.NET 2.0 and click on abrViewer.NET 2.0 to launch the application:

Conversion Process

Step 2: Once the download is complete, unzip the archive to a temporary directory and run through the setup to install the application.  Once installed, you’ll find the new application under Programs > abrViewer.NET 2.0 and click on abrViewer.NET 2.0 to launch the application:
Conversion Process

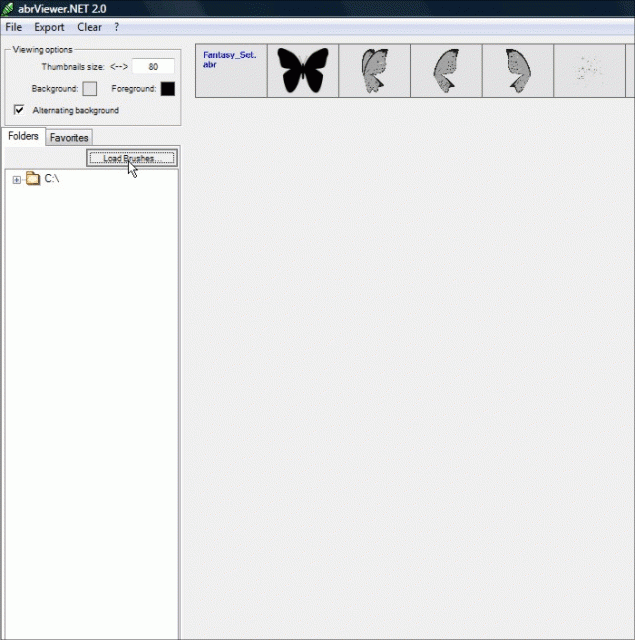
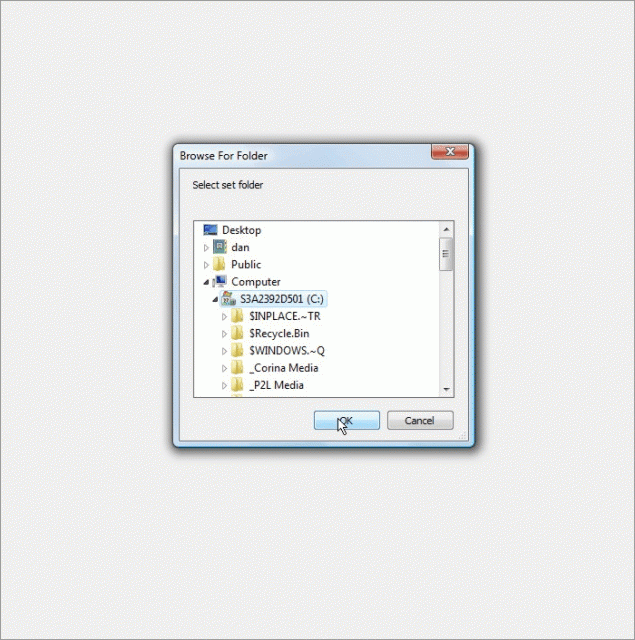
Step 3: Time to load the brushes we want and export them to .png files!  With the application now open, click on the Load Brushes button and browse to the folder where the .abr file is located:
Simply double-click on the .abr file you want and it will show you a preview of the brushes contained in the pack:
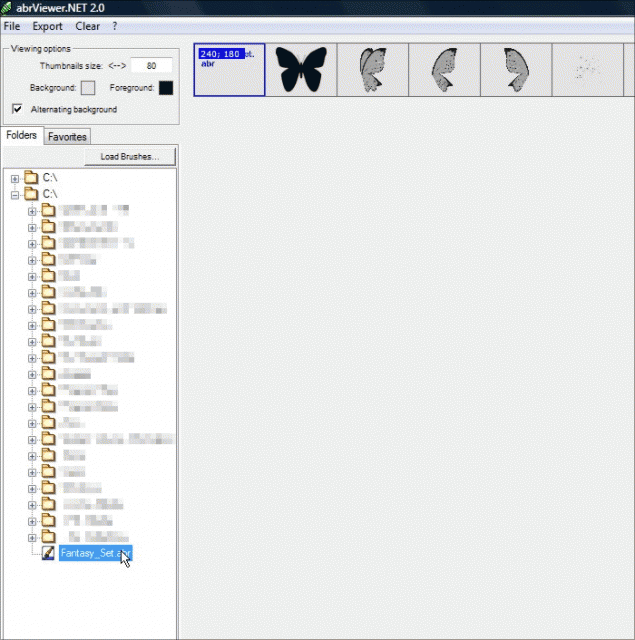
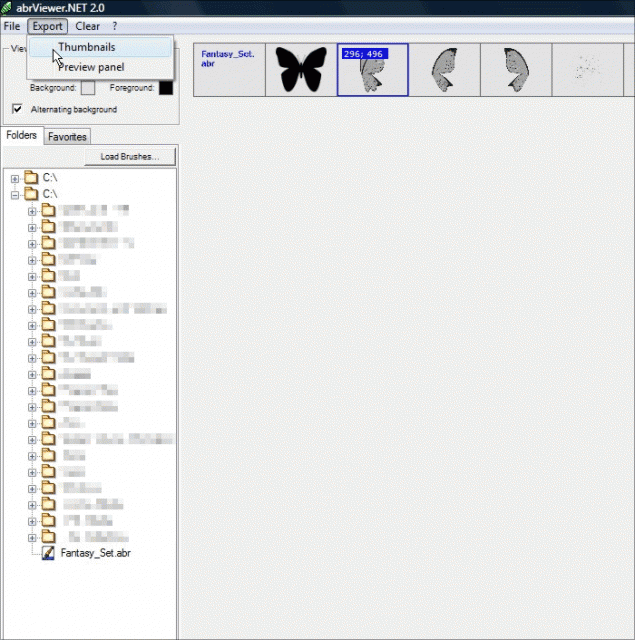
Now click on Export > Thumbnails and it will open a file browsing window.  Browse to the folder you want to save the .png files in and click OK.


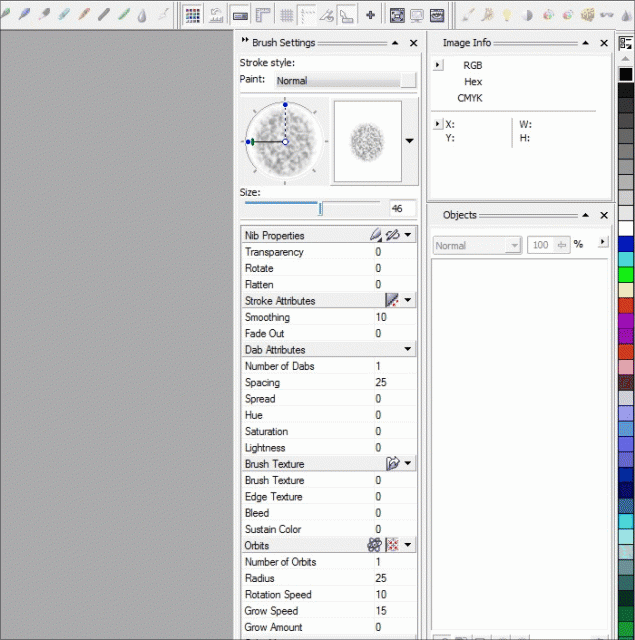
This is what the docker looks like when it’s in use (If you don’t have a document open and you’re not using the brush tool, the docker will just be blank):
Importing the Brush

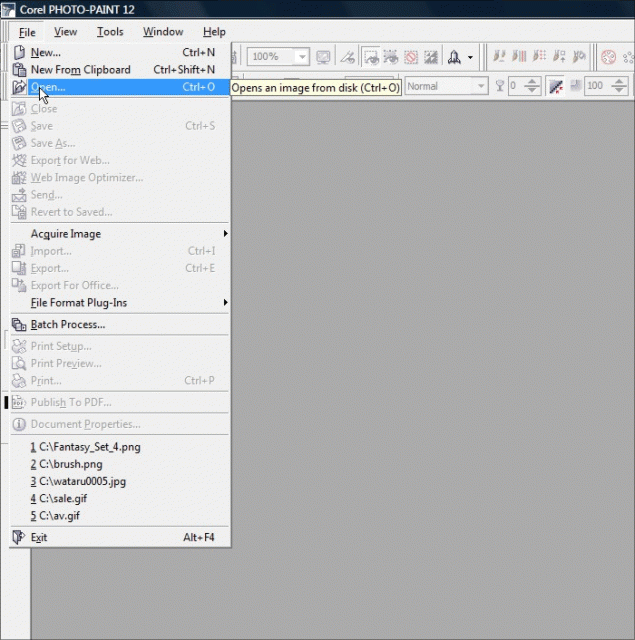
Step 5: We can now create the brush nib.  Open the .png file for the brush you want to create:
Note that the preview may be blank or a solid black square.  That’s normal, it’s just too small to show you the masks contained within the .png file.
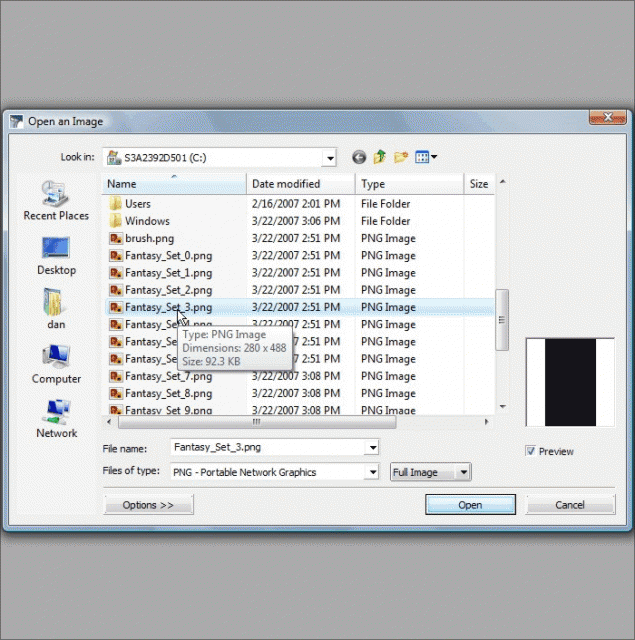
Click OK and it will open the .png file with the masks intact outlining the entire brush:


You will be prompted for a default brush size… you can either set one or use the preset default:
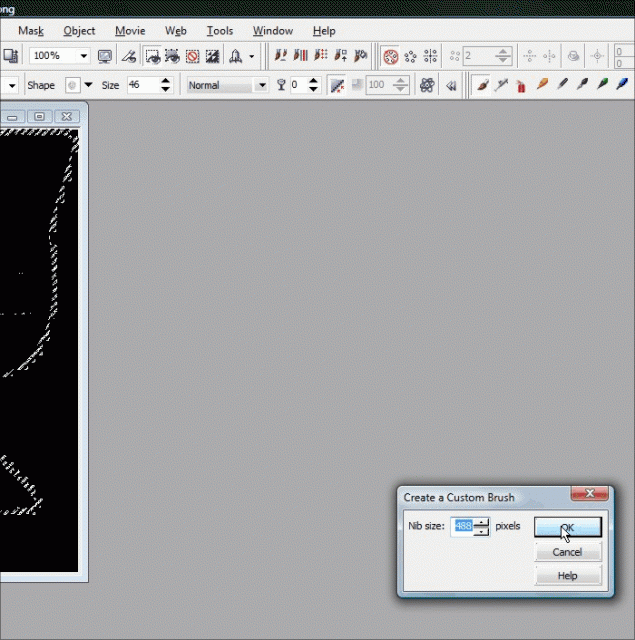
The Photoshop brush is now your new nib!  Congrats!

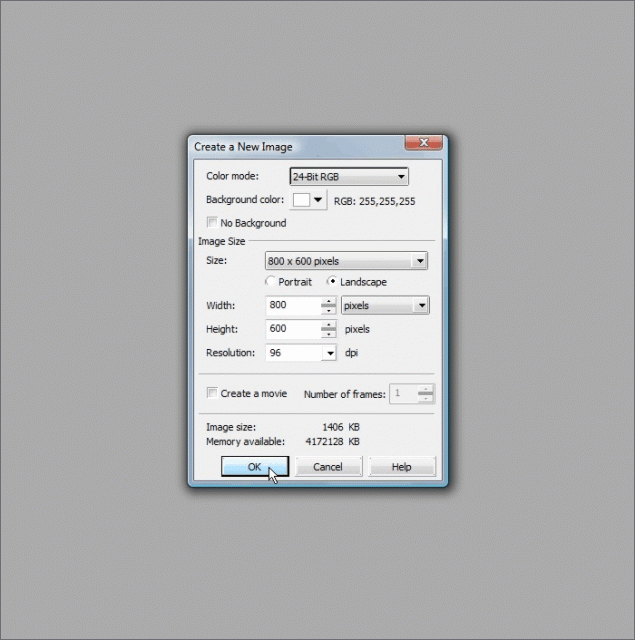
Step 6: Shall we play with our new brush?  Yay!  Happy times!  Create a new document with whatever settings float your boat and start BRUSHING!
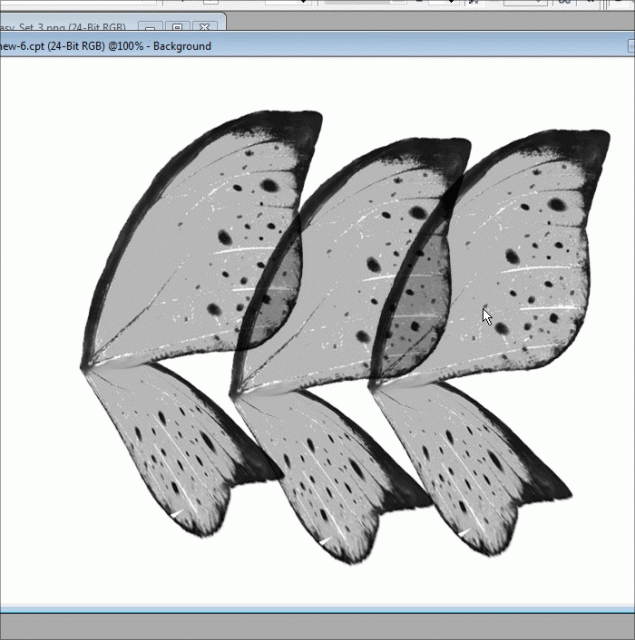
Just click on the workspace and your brush pattern will be applied, of you can hold the mouse button down and paint solid lines of the nib pattern:
You can also reduce or expand the size of the nib and change the angles, opacity etc:
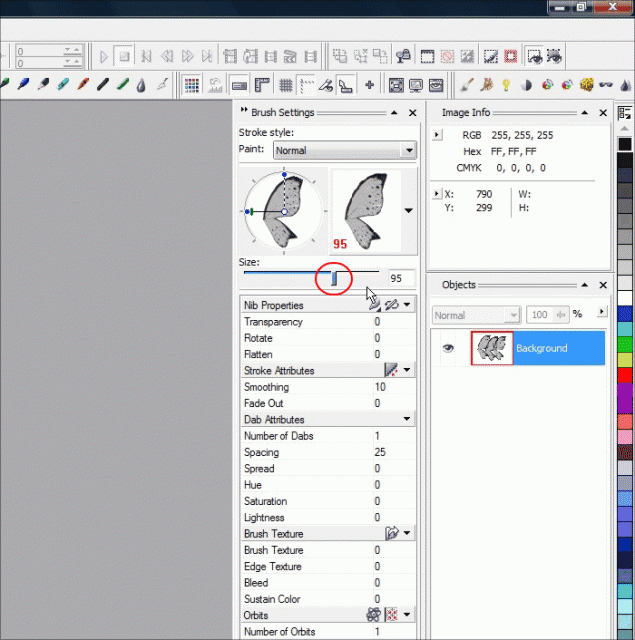
Smaller brush size:
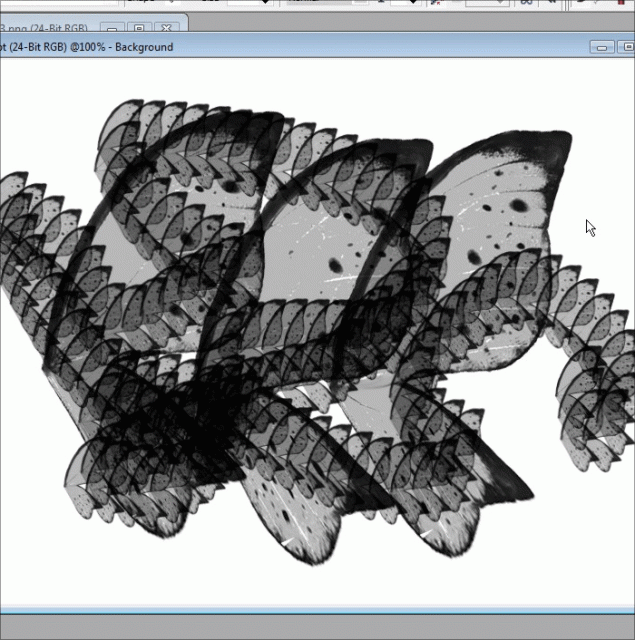
Using colors:
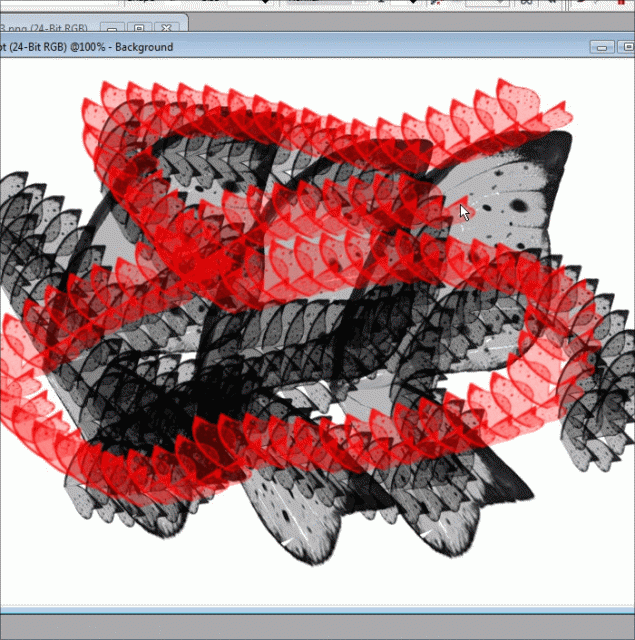
Conclusion

So remember, the next time you see a poor soul drooling at the never ending line-up of Photoshop filters that he *thinks* he can’t use in Photopaint, save his life and show him this tutorial!

I hope you enjoyed this tutorial and you are now happily using .abr brushes in your Corel products.  Thanks again for reading and we’ll see you next time!

Dan