Browsed by
Category: Tutorials

How to Load and Install Corel Photopaint NIB Brush Packs

How to Load and Install Corel Photopaint NIB Brush Packs

A little while ago, I started offering a few brush packs for Corel Photopaint users on my blog (You can actually find those HERE) and I’ve been receiving quite a few inquiries on how exactly one goes about installing them.  Today’s little tutorial will run you through the easy process of installing the packs and explaining how they work.

WARNING: PLEASE NOTE!  Do not think of these as extra brushes you can pick… these are complete nib replacements for Photopaint, so when you use one of these packs, it will contain the default Photopaint brushes AND the extra brushes stated in the pack you download

The first thing I need to tell you is that the NIB management in Photopaint absolutely SUCKS and it’s full of bugs that have yet to be resolved.  in fact, if you Google around, you’ll find tons of posts from angry Photopaint users asking about various issues with loading, creating and deleting Nibs for pretty much any version of Corel Photopaint, including right up to X3, the latest release.  In fact, if you mess around with the Nib packs too much, you can completely corrupt the install and then you’re in for some real fun.  Here are some wonky things I noticed in the Nib management area:

  • There is a maximum number of Nibs you can add, and it’s very limited.  To make matters worse, if you hit that maximum, your Nib list starts going crazy. I don’t know what the max is… I hit it once and it killed my install and it was only after I found out there was a maximum.
  • Shouldn’t delete nibs, only add to the current ones in the pack you are using.  It’s hard to describe what happens to someone who hasn’t experiences the marvel of this absolutely infuriating bug.  Basically, let’s pretend you have 50 nibs in your pack and you delete the last two.  Let’s pretend the last 2 are some kind of circular brush.  Now, let’s say you add 2 new nibs to this pack… instead of showing the new nib in the list, it will show you the two circular nibs instead!  BUT, when you click on the nib, it will actually be your new nib shape.  Now, imagine the frustration of having a pack with 50 nibs that all have the wrong thumbnails attached.
  • You can’t start a new nib pack… you would think you can create a blank pack and start adding your own brushes, but you can’t.  I even found a blank nib pack on the net awhile ago, but when I tried adding nibs to it, I got the same issue as mentioned in the previous point.

I love Corel Photopaint, but the NIB interface is absolute crap and it’s the only huge bug I know of in Photopaint and it baffles my mind that this has not been fixed after several YEARS!  So, with that said, screwing around with Nibs SUCKS, so don’t do it unless you’re pretty good and navigating the unknown in the realm of software.  Lucky for you, I have these easy to download and install replacement packs!  You don’t have to worry about messing around with your packs, deleting and adding nibs etc… you simply download the pack and load it and you’re done.

Again, don’t think of this as extra brushes you are adding to Photopaint… it’s not.  These are complete Nib replacement packs that contain all the default Photopaint Nibs PLUS the extra Nibs stated in the pack.  So if you download the Blood Pack, each Nib pack includes the default Nibs, PLUS the Blood Nibs.  Make sense?

OK, so now let me show you how to install the packs, it’s easy.

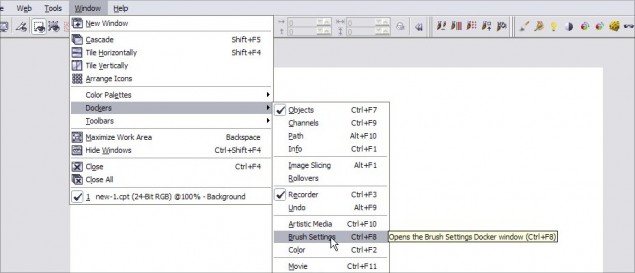
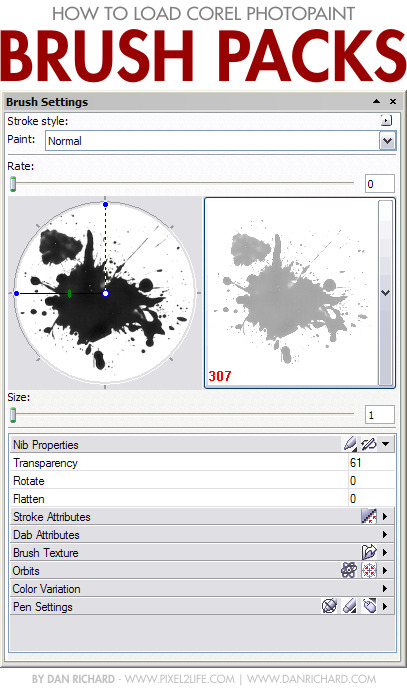
Step 1 – First thing you need to do is open Photopaint and either open up an image to edit or create a new file.  We’ll need to have something open to access the brush tools.  Once that’s open, we’ll need to open the Brush Settings Docker.  Click on Window > Dockers > Brush Settings and the Docker will open.

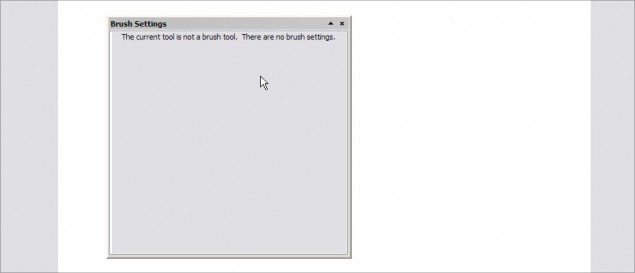
The Docker will open and probably be blank like this:

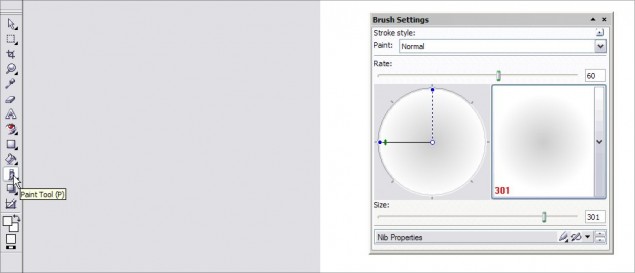
To activate the Docker so it shows the options, click on the Paint Tool icon, or just hit P:

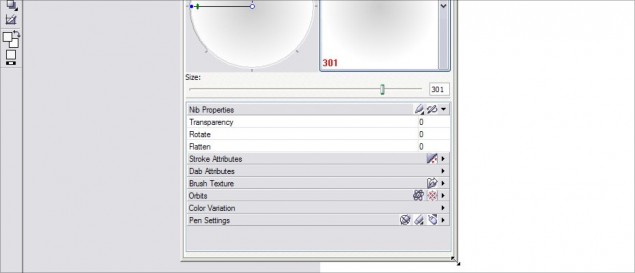
be sure to stretch the Docker open so you can see all the options:

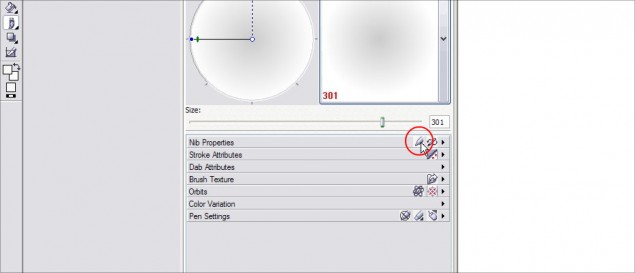
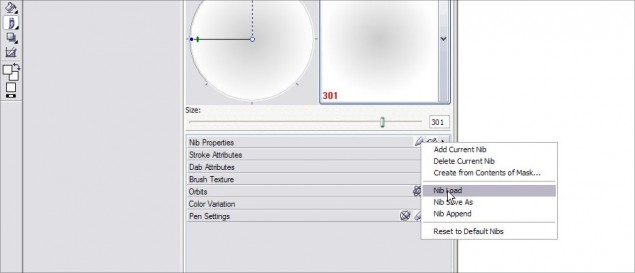
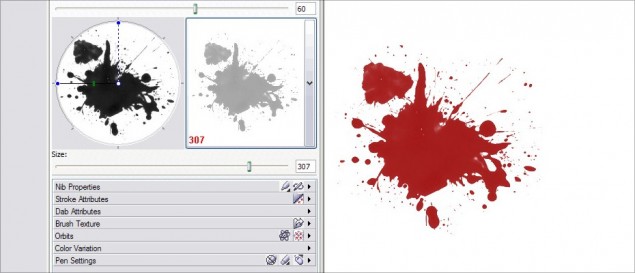
Step 2 – Time to load the Nib pack!  Click on the Nib Options button (circled in red below) and then click on Nib Load to open a file browser window:

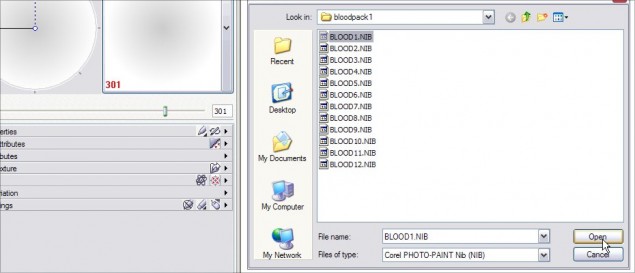
Now, just browse to the Nib pack you downloaded and extracted and click on the one you want:

All done!

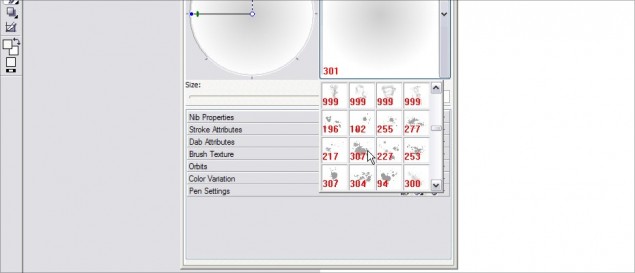
Step 3 – You can now select the nib shape and get to work!  Just use the Nib Browser to scroll through the thumbnails and you’ll see that you now have the same default Nibs, plus the custom ones towards the bottom:

Click the one you want and you’re good to go!

Pro Tip: Remember, you can use these brushes with any of the Paint tools, eraser, clone tools etc… any tool that lets you use a Nib will let you use these custom packs.

That’s it gang, easy as pie… Thanks again for reading my tutorial and please be sure to comment below or share this with your friends!

Thanks,
Dan
The IE Ctrl-Q Thumbnail View Trick

The IE Ctrl-Q Thumbnail View Trick

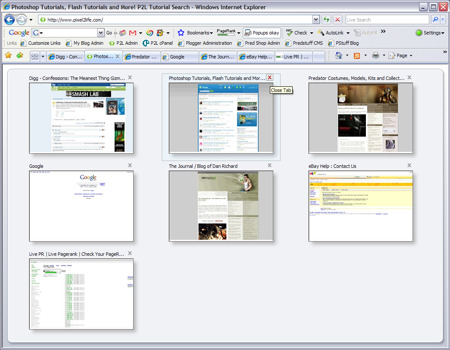
Hey guys… I just accidentally found a nifty little trick when using IE 7 that I didn’t know about. There is a keyboard shortcut that quickly allows you to see a thumbnail view of all tabs you have open in your browser, and from there you can click on one you want or close down the ones you don’t need. If you have a ton of tabs open like I do, this is WAY easier than fumbling around with the little tabs at the top.

So, here is the browser open with several tabs on the go:

And this is how it looks when you hit Ctrl-Q:

It’s an addicting little trick… kind of like using Windows Key – E to open Windows Explorer instead of doing a right click on the start button or even worse, doing the All Programs > Explore bit…

I also checked FF, Safari and Opera for this little bit of trickery, but it appears only IE has this particular feature. So next time you get in a penii measuring contest over FF vs IE or whatever, remember, you’ve got the Ctrl-Q trick up your sleeve!

Dan

Google Page Rank – Why it’s not “Just a Number” and Google Knows it!

Google Page Rank – Why it’s not “Just a Number” and Google Knows it!

As promised, I would like to address the statement that Google PR is “a meaningless number”, “it’s a void and empty score” or “it’s just a number”… Sorry guys, but it’s not as much as we would love it to be, and Google knows it’s not. So with Tom Berringer’s help, I’ll try to explain my point of view on why PR is as important as ever and how the latest PR penalties are damaging even if they don’t affect traffic directly.

Google PR is like Tom Berringer in

There’s a great saying in this badass action movie, and it comes towards the beginning of the movie when Jonathan Shale (played by Tom Berringer) is looking to establish authority over his ghetto classroom and he is guided by the words of Principal Claude Rolle (played by Ernie Hudson). He explains in order to gain instant respect with his students, at the beginning of the year they have a presentation where he basically smashes his fist through a piece of wood, hinting rather strongly at what will happen to anyone deciding to get a little too uppity in class. He then explains he uses the concept of “power perceived is power achieved”, and he’s absolutely right. Even though he didn’t physically break some punk in two, the students definitely knew that’s what would happen if they stepped out of line.

Well, Google has broken their boards a few times and have created a similar concept: “Value perceived is value achieved”.

There is no arguing that there is perceived value in achieving high page rank, and if you can increase your site’s page rank, you achieved in earning your site increased value. You can scream that page rank is meaningless all you like, but there is no question that PR is alive and well, even if it has nothing to do with your traffic any more or even your quality. In the hearts and minds of webmasters the world over, PR is just one of a few key indicators or a website’s value and is used to gauge all sorts of dollar related indicators. And examples are out in plain sight!

Along with Alexa ratings, Google PR is one of the biggest selling points for any site looking to sell ad space, services or even to sell itself. In fact, PR can even be used to gain customer trust… surely a website with a PR 5 can be trusted a lot more than some PR 2 site that sells the exact same thing right? Value perceived is value achieved.

If there’s one thing Google knows, it’s how to make money and how to influence the web, even if it’s to simply correct or improve their own internal functionality. Let’s face it, if Google has a policy change for internal controls that affects ranking or positioning, webmasters around the world jump on it like wildfire and look at how to optimize and adapt their sites to this new change. It’s only natural, there’s nothing to be ashamed of… many of us count on Google for TONS of traffic, revenue, sustainability and ultimately, e-survival. In this latest move to penalize key websites for selling links to influence their PR index, Google knows exactly what they are doing… by lowering visible PR ratings, they are reducing the perception of value in that site. You’ll have a lot harder time justifying your ad asking prices if you went from a PR7 to a PR4 despite your traffic levels staying exactly the same.

Same thing goes for those of you looking to sell your website or company. One of the first things an experienced buyer will do is check your PageRank… if your sales pitch is reporting massive inbound site traffic but your PR is in the toilet, it does nothing but raise red flags. Then if you try to explain that your PR has been penalized and you’re “really a PR 7”, you’ve just raised another flag and opened up a can of worms. Would YOU buy a site that had just been penalized for any reason by Google? That’s like buying a car that a mechanic just warned you about shooting flames out the exhaust pipe, but “it’s nothing to worry about”.

How about SEO companies? Would you take an SEO company trying to sell you an expensive consulting package seriously if their own website couldn’t muster up anything beyond a PR4? Sure, it’s just a number right? Somehow I don’t think so… again, value perceived is value achieved, and the door swings both ways.

So how does Google fix this? They can’t and they probably won’t… truth be told, PR should simply be removed in favor of a visitor related tracking system similar to the Alexa rating system tracked via the millions of people using the Google Toolbar. Visible PR is meaningless purely from a search point of view, I agree… but when it comes to perceived website value, having your Google Page Rank penalized is a crushing blow to anyone’s monetization efforts and I truly feel bad for any webmaster that was hit with this problem and innocently had no idea their linking methods would land them in trouble.

That’s my take on the PR number issue, and I hope you’ve enjoyed my rather stretched out analogy. I’d love to hear your thoughts on the matter so please feel free to click on the comment button below and use the form to share your feedback with me and the rest of my blog readers.

Dan

How to Customize the Default Image and Link Paths in the WordPress Editor

How to Customize the Default Image and Link Paths in the WordPress Editor

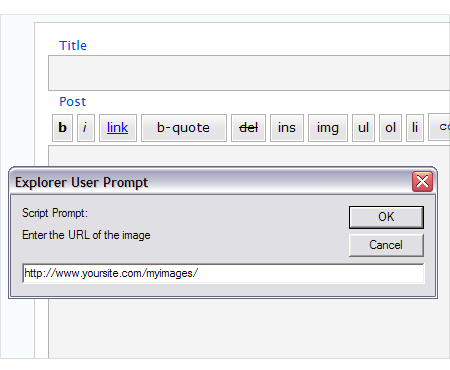
Here’s a cool little trick Jamie figured out for me… I pretty much use the exact same path for all the images I post on this blog and I got tired of always typing out the path to the image folder along with the image name in the javascript popup you get when you click on the IMG button within the editor. I noticed that the pop-up always had http:// already filled in by default and I realized that I could probably change that to the image path I typically use to save some time. Being the coding idiot I am, I had no idea how to even start looking for this setting (although I did try for about an hour and found jack…) so I hounded Jamie about it and he found it in roughly 3.2 seconds.

Here’s how you do it…

Step 1: Open up your quicktags.js file located in the following subdirectory off your WP install dir: /wp-includes/js/

Step 2: Scroll down to the very bottom of the file and you will find the two functions that control the LINK button (edInsertLink) and the IMG button (edInsertImage)

The first function is the default URL you see when you click on the LINK button to insert a hyperlink. Change http:// on the following line to whatever path you want to come up by default:

function edInsertLink(myField, i, defaultValue) {
if (!defaultValue) {
defaultValue = 'http://';

The second function controls the IMG button… change http:// on the following line to whatever path you want to come up by default when you click on the IMG button:

function edInsertImage(myField) {
var myValue = prompt(quicktagsL10n.enterImageURL, 'http://');

Step 3: Save and upload and you’re all set! Here’s a shot of it in action:


Enjoy and thanks again Jamie for this awesome little time saver!

Dan

New Tutorial on Cracked Text and Photos, New Splash for a Friend, Rescue Me and v5?

New Tutorial on Cracked Text and Photos, New Splash for a Friend, Rescue Me and v5?

Hey guys! There’s been quite a bit of activity lately and I’ve been sort of dabbling in all kinds of spots… So here’s a quick round-up of what’s new, what I’ve been up to and all that jazz. First off, I want to show you a little splash page I made for a friend of mine. As some of you may know, I’m pretty heavy in to the Garage Kit community and one of my good friends and favorite artists in the community is Joe Dunaway, who is especially famous for his insanely awesome Predator model kit build-ups. Anyhow, I host a gallery page for him and he asked me to hook him up with a new front Splash page for him. Here’s what I came up with:

ModelZone Splash

You can check out the full thing at www.modelzone.com

I really liked the way this came out, and I really liked the way the ripple effect on the reflection turned out, making the logo look like it’s sitting in water. Call me bias, but I thought this turned out really cool. So then I was puttering around thinking of a new tutorial to write when I thought maybe folks would like to know how I made that cracked text effect and the rippled reflection. You can apply that cracked effect to anything actually.. text, objects, photos etc. So, I decided to divide this up in to a 2-part tutorial, starting with how to create cracked text and objects in Corel Photopaint.

Cracked Text Tutorial

This tutorial is once again published on the Pixel2life Publishing System, and I invite you to come check out my latest lesson HERE! This tutorial covers how to apply cracks and other textures to a variety of surfaces in a technique that is as easy as pie!

In a couple of weeks I’ll also be posting the second part that shows how I made the ripple reflection part, so stay tuned for that.

It’s also been pretty busy for me because Halloween is fast approaching and one of my new services on Predatorstuff.com is my costume sales. I’ve teamed up with Kre8-FX and the talented Pete Mander to create the ultimate Predator costume and this is our first Halloween round and it’s been MADNESS! We’re actually shipping out the first suits next week and I am REALLY stoked at showing off the final pics. Here’s a photo of the upper torso of an AvP Predator costume we released a couple of weeks ago:

Predator Costume

If you want to see more about these suits we’re doing, check out the post on www.predatorstuff.com.

And you thought I only did tutorials? HAR!

And on an entertainment note, is anyone else out there completely obsessed with how kick-ass Rescue Me is? I’ve been a Dennis Leary fan for years and his Fireman TV series is absolutely his best work and one of the best television series I have EVER seen.

Rescue me

If you have no idea what I’m talking about, Rescue me is an edgy adult TV series about the lives of various FNDY firefighters post 9/11 and how badly their lives have turned since that tragic day. It’s EXTREMELY gritty and isn’t carried on regular stations, it’s only on speciality stations like Fox’s action showcase channel. There’s loads of swearing, sexual content and has quite often had me in tears from laughing so hard. The 4th season JUST wrapped up and you can find the first 3 series on DVD all over the place. I HIGHLY recommend you check out this show, it’s every bit as good as reviewers say it is. I personally think television SUCKS and 99% of TV shows are absolute garbage, especially reality shows and all that nonsense. There’s only a couple of series I enjoy, like Third Watch (sucks it’s over), Prison Break (although that’s starting to get tedious now), but Rescue Me is probably the best thing since MacGyver!

You can also check out their official website at www.fxnetwork.com for showtimes and details about the production and cast.

The other day some P2L community members were talking about various ideas to boost the forum participation up and one of them jokingly poked a jab saying maybe we should start talking about version 5 of P2L, even though we just released v4. Well, I didn’t say anything he’d be surprised how close he came to the mark, because I am indeed already mulling over ideas and concepts for the 5th version of the site. There’s nothing SOLID down yet, but one of the things we are looking at is the possibility of a complete redesign and leaving behind the look we’ve more or less carried around since v2. This would be one of the biggest things we’ve done on the site actually as a new layout can be a make-it-or-break-it move. I’ve already been working with Nick and 2 other professional design groups, which will remain unnamed for the time being, on some concept designs, but I haven’t decided on anything yet. I just figured that being the guy that has designed everything on the site for the last 4 years, maybe it’s time we had a fresh set of eyes look at a design and freshen things up completely.

So nothing concrete on this yet, but I thought I’d mention it here for the few of you that read my blog, let alone read enough of this post to make it to this point.

So that’s about it for me… very busy on all kinds of projects and trying to have some fun in between. Take care gang and we’ll see you next post!

Dan